Today we going to discuss FormBuilder extension installation and its features. Form Builder Extension helps to create unlimited forms using the drag and drop feature. This extension support 14 different types of fields, plus you can customize the form and the mail contents. The form supports Ajax-powered submitting, CAPTCHA, third-party API integration, and so on.
Let’s take a quick review of its features:
- Intuitive panel Design with Drag & Drop Form Builder.
- Support 14 different Field Types.
- Various options for each field type.
- Field type validation on both client-side and server-side.
- Multiple submission actions: Save to Database, Call Custom API (tested on Sendinblue), Send Email.
- Option to publish the form as public or for authenticated users.
- On Success and OnError configuration.
- Shortcodes to embed easily on any CMS page or template.
- Duplication submission detection.
- View and export submissions.
- Enable/Disable Google reCaptcha V3 for the form to protect from spam
Now, let’s start the installation steps:
- Unzip all the files to packages/Ridhima/FormBuilder.
- Goto composer.json file inside the Bagisto root directory then add the following line under ‘psr-4’
"Ridhima\\FormBuilder\\": "packages/Ridhima/FormBuilder/src"
- Goto config/app.php file then add the following line under ‘webkul packages’
Ridhima\FormBuilder\Providers\FormBuilderServiceProvider::class,
- Goto config/concord.php file then add the following line at the bottom
\Ridhima\FormBuilder\Providers\ModuleServiceProvider::class,
- Run the below commands before publishing assets to the public folder:
composer dump-autoload
php artisan config:clear
php artisan cache:clear
php artisan route:clear
php artisan storage:link
- Run below artisan command to run migration file:
php artisan migrate
- After that run the below command to publish config and theme files:
php artisan vendor:publish --provider="Ridhima\FormBuilder\Providers\FormBuilderServiceProvider"
- Optional add Google reCaptcha V3 keys in your project .env file:
GOOGLE_RECAPTCHA_SITE_KEY=
GOOGLE_RECAPTCHA_SECRET_KEY=
- Optional artisan command to generate dummy form data:
php artisan db:seed --class="Ridhima\FormBuilder\Database\Seeders\DummyFormTableSeeder"
Now you are ready to generate a custom form for your website.
How to implement the newly created form on the website page?
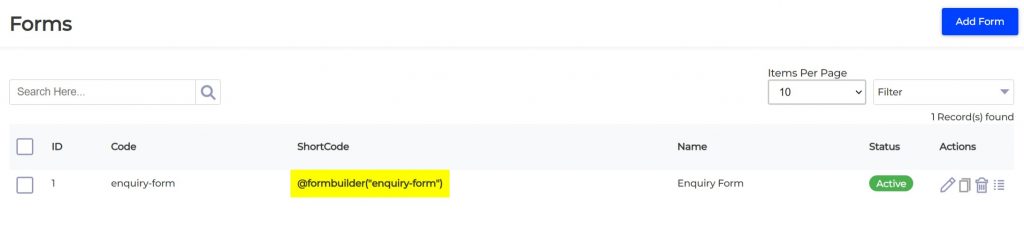
Copy your form’s unique name display under the “ShortCode” column (please see the below image for reference)
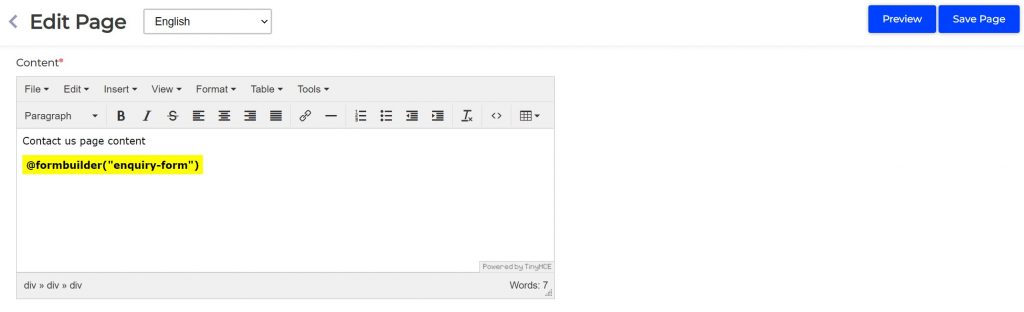
Paste the copied unique name from the above step in the editor of the CMS page (please see the below image for reference)
For additional configuration such as managing upload path and mime types etc go to “config → formbuilder.php”