Today we are discussing how to install Blog extension which is a PHP package designed for the Bagisto eCommerce framework, that allows you to very quickly and easily add a powerful and useful blog system to your website.
Let’s take a quick review of its features:
- Multi-language support in blog posts, categories & tags
- Multi-channel support in a blog post only
- You can add primary (for slug) and additional categories to the post
- SEO friendly URL eg: /blog/page/{PAGE_NUMBER} /blog/{PRIMARY_CATEGORY}/{POST_SLUG}
- Responsive image support
- Option to disable comment widget for individual post
- Customize the social share buttons
- Post like button (only for the authorized customer)
- Display categories and tags list with the number of posts count (option to disable post counts)
- The number of widgets such as showing previous and next posts on the post detail page, recent posts on the homepage, related posts on the detail page, recent posts & comments with nested replies supports, etc.
- Option to limit the number of posts to display per page, related posts & recent post
- Option to change the ordering of recent posts such as recent, popularity, or random
- Option to enable/disable author page, comment widget (globally), guest comment, comment moderation, email notification for a – new comment to post’s author & Google reCaptcha for comment form to protect from spam
- Option to add multiple email addresses to receive an email notification for new comment
- Control the maximum nested comment depth
Now, let’s start the installation steps:
- Unzip all the files to packages/Ridhima/Blog.
- Goto composer.json file inside the Bagisto root directory then add the following line under ‘psr-4’
"Ridhima\\Blog\\": "packages/Ridhima/Blog/src"
- Goto config/app.php file then add the following line under ‘webkul packages’
Ridhima\Blog\Providers\BlogServiceProvider::class
- Goto config/concord.php file then add the following line at the bottom
\Ridhima\Blog\Providers\ModuleServiceProvider::class,
- Run the below commands before publishing assets to the public folder:
composer dump-autoload
php artisan config:clear
php artisan cache:clear
php artisan route:clear
php artisan storage:link
- Run the below artisan command to run the migration file:
php artisan migrate
- Run the below artisan command to run the configuration seed:
php artisan db:seed --class="Ridhima\Blog\Database\Seeders\BlogTableSeeder"
- After that run the below command to publish config and theme files:
php artisan vendor:publish --provider="Ridhima\Blog\Providers\BlogServiceProvider"
- Optional artisan command to generate dummy blog data:
php artisan db:seed --class="Ridhima\Blog\Database\Seeders\DummyPostTableSeeder"
- Add below lines of code in config\imagecache.php to add responsive post’s image sizes under ‘templates’.
'templates' => array(
...
...
'blog_featured' => 'Ridhima\Blog\CacheFilters\Featured',
'blog_desktop' => 'Ridhima\Blog\CacheFilters\Desktop',
'blog_tablet' => 'Ridhima\Blog\CacheFilters\Tablet',
'blog_mobile' => 'Ridhima\Blog\CacheFilters\Mobile',
),
- Goto config/app.php file and add the below lines of code. This will automatically cache Bagisto’s configuration data to reduce the number of database calls throughout the application. This is an optional step, you can use or skip this as per your requirement.
// Webkul\Core\Providers\CoreServiceProvider::class, # comment this line
Ridhima\Blog\Providers\CoreServiceProvider::class,
Now you are ready to publish your own posts.
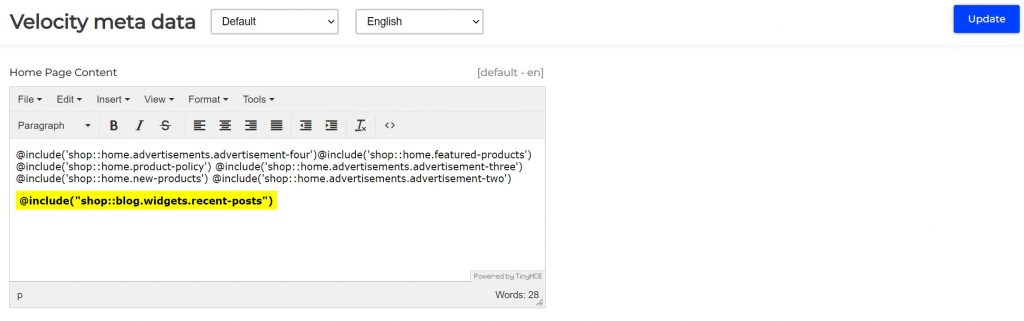
How to show the most recent posts on the homepage or other pages of the website?
Just copy and paste this @include(‘shop::blog.widgets.recent-posts’) short-code into your content editor (please see the below image for reference)
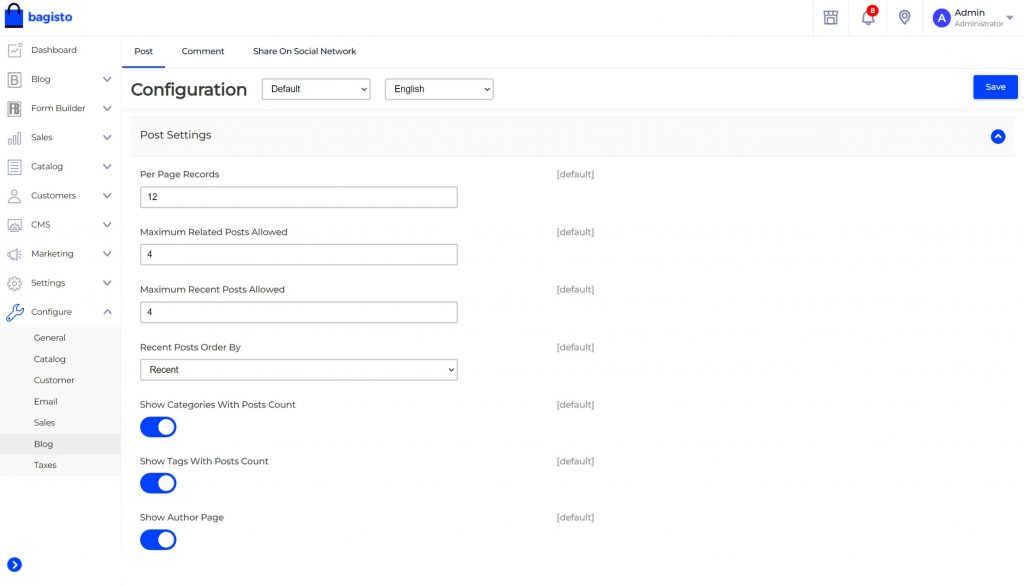
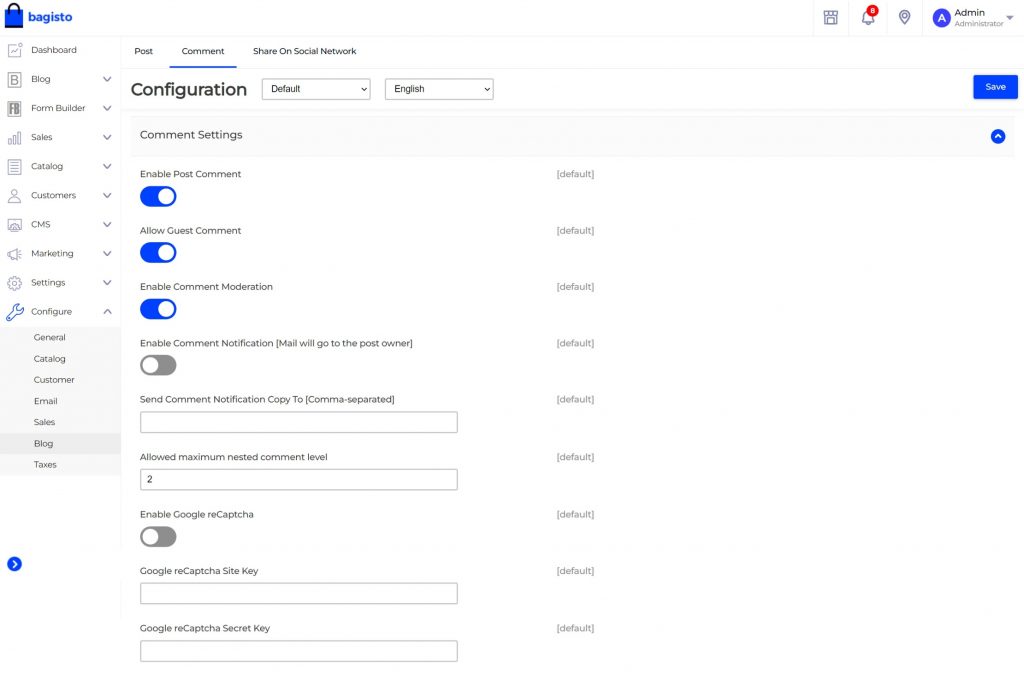
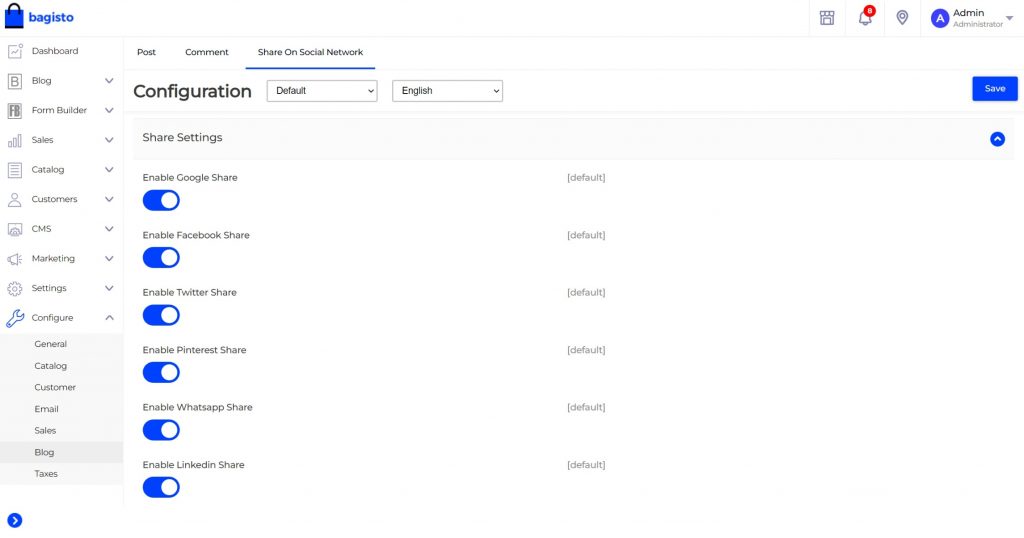
Enable/Disable additional blog features from the “Configuration → Blog” section
For additional configuration such as managing upload image path and size go to “config → blog.php”